
简介
使用 Apps SDK 构建的应用通过 模型上下文协议 (MCP) 连接到 ChatGPT。要使用 Apps SDK 为 ChatGPT 构建应用,你需要:
- 一个 Model Context Protocol (MCP) 服务器(必需),用于定义你的应用的功能(工具)并将其暴露给 ChatGPT。
- (可选)一个使用你选择的框架构建的 Web 组件,如果你需要 UI,它将在 ChatGPT 内部的 iframe 中渲染。
ChatGPT 实现了开放的 MCP Apps UI 标准,因此你只需构建一次 UI,即可在所有兼容 MCP Apps 的宿主中运行它。
在本快速入门中,我们将构建一个简单的待办事项列表应用,它包含在一个单独的 HTML 文件中,将标记、CSS 和 JavaScript 集中在一起。
要查看使用 React 的更多高级示例,请参见 GitHub 上的示例代码库.
构建 Web 组件
此步骤为可选。如果你只需要工具而不需要 ChatGPT UI,请直接跳到 构建 MCP 服务器 并且不要注册 UI 资源。
首先,让我们创建一个名为 public/todo-widget.html 的文件,放在一个新目录中,该文件将作为由 ChatGPT 中的 Apps SDK 渲染的 UI。此文件将包含要在 ChatGPT 界面中渲染的 Web 组件。
添加以下内容:
<!DOCTYPE html>
<html lang="en">
  <head>
    <meta charset="utf-8" />
    <title>Todo list</title>
    <style>
      :root {
        color: #0b0b0f;
        font-family:
          "Inter",
          system-ui,
          -apple-system,
          sans-serif;
      }

      html,
      body {
        width: 100%;
        min-height: 100%;
        box-sizing: border-box;
      }

      body {
        margin: 0;
        padding: 16px;
        background: #f6f8fb;
      }

      main {
        width: 100%;
        max-width: 360px;
        min-height: 260px;
        margin: 0 auto;
        background: #fff;
        border-radius: 16px;
        padding: 20px;
        box-shadow: 0 12px 24px rgba(15, 23, 42, 0.08);
      }

      h2 {
        margin: 0 0 16px;
        font-size: 1.25rem;
      }

      form {
        display: flex;
        gap: 8px;
        margin-bottom: 16px;
      }

      form input {
        flex: 1;
        padding: 10px 12px;
        border-radius: 10px;
        border: 1px solid #cad3e0;
        font-size: 0.95rem;
      }

      form button {
        border: none;
        border-radius: 10px;
        background: #111bf5;
        color: white;
        font-weight: 600;
        padding: 0 16px;
        cursor: pointer;
      }

      form button:disabled {
        opacity: 0.7;
        cursor: not-allowed;
      }

      input[type="checkbox"] {
        accent-color: #111bf5;
      }

      ul {
        list-style: none;
        padding: 0;
        margin: 0;
        display: flex;
        flex-direction: column;
        gap: 8px;
      }

      li {
        background: #f2f4fb;
        border-radius: 12px;
        padding: 10px 14px;
        display: flex;
        align-items: center;
        gap: 10px;
      }

      li span {
        flex: 1;
      }

      li[data-completed="true"] span {
        text-decoration: line-through;
        color: #6c768a;
      }

      li[data-busy="true"] {
        opacity: 0.7;
      }
    </style>
  </head>
  <body>
    <main>
      <h2>Todo list</h2>
      <form id="add-form" autocomplete="off">
        <input id="todo-input" name="title" placeholder="Add a task" />
        <button type="submit">Add</button>
      </form>
      <ul id="todo-list"></ul>
    </main>

    <script type="module">
      const listEl = document.querySelector("#todo-list");
      const formEl = document.querySelector("#add-form");
      const inputEl = document.querySelector("#todo-input");
      const addButtonEl = formEl.querySelector('button[type="submit"]');
      const addButtonText = addButtonEl.textContent;

      let tasks = [];
      let isAdding = false;
      const busyTodoIds = new Set();

      const render = () => {
        listEl.innerHTML = "";
        tasks.forEach((task) => {
          const li = document.createElement("li");
          li.dataset.id = task.id;
          li.dataset.completed = String(Boolean(task.completed));
          li.dataset.busy = String(busyTodoIds.has(task.id));

          const label = document.createElement("label");
          label.style.display = "flex";
          label.style.alignItems = "center";
          label.style.gap = "10px";

          const checkbox = document.createElement("input");
          checkbox.type = "checkbox";
          checkbox.checked = Boolean(task.completed);
          checkbox.disabled = busyTodoIds.has(task.id);

          const span = document.createElement("span");
          span.textContent = task.title;

          label.appendChild(checkbox);
          label.appendChild(span);
          li.appendChild(label);
          listEl.appendChild(li);
        });
      };

      const updateFromResponse = (response) => {
        if (response?.structuredContent?.tasks) {
          tasks = response.structuredContent.tasks;
          render();
        }
      };

      // MCP Apps standard bridge: JSON-RPC messages over postMessage.
      //
      // - Initialize the bridge with `ui/initialize`.
      // - Confirm readiness with `ui/notifications/initialized`.
      // - Call tools with `tools/call`.
      // - Listen for `ui/notifications/tool-result` to react to model-initiated tool calls.
      let rpcId = 0;
      const pendingRequests = new Map();

      const rpcNotify = (method, params) => {
        window.parent.postMessage({ jsonrpc: "2.0", method, params }, "*");
      };

      const rpcRequest = (method, params) =>
        new Promise((resolve, reject) => {
          const id = ++rpcId;
          pendingRequests.set(id, { resolve, reject });
          window.parent.postMessage(
            { jsonrpc: "2.0", id, method, params },
            "*"
          );
        });

      window.addEventListener(
        "message",
        (event) => {
          if (event.source !== window.parent) return;
          const message = event.data;
          if (!message || message.jsonrpc !== "2.0") return;

          // Responses
          if (typeof message.id === "number") {
            const pending = pendingRequests.get(message.id);
            if (!pending) return;
            pendingRequests.delete(message.id);

            if (message.error) {
              pending.reject(message.error);
              return;
            }

            pending.resolve(message.result);
            return;
          }

          // Notifications
          if (typeof message.method !== "string") return;
          if (message.method === "ui/notifications/tool-result") {
            updateFromResponse(message.params);
          }
        },
        { passive: true }
      );

      const initializeBridge = async () => {
        const appInfo = { name: "todo-widget", version: "0.1.0" };
        const appCapabilities = {};
        const protocolVersion = "2026-01-26";

        try {
          await rpcRequest("ui/initialize", {
            appInfo,
            appCapabilities,
            protocolVersion,
          });
          rpcNotify("ui/notifications/initialized", {});
        } catch (error) {
          console.error("Failed to initialize the MCP Apps bridge:", error);
          throw error;
        }
      };

      const bridgeReady = initializeBridge();

      const callTodoTool = async (name, payload) => {
        await bridgeReady;
        const response = await rpcRequest("tools/call", {
          name,
          arguments: payload,
        });
        updateFromResponse(response);
      };

      formEl.addEventListener("submit", async (event) => {
        event.preventDefault();
        const title = inputEl.value.trim();
        if (!title || isAdding) return;

        isAdding = true;
        addButtonEl.disabled = true;
        addButtonEl.textContent = "Adding…";

        try {
          await callTodoTool("add_todo", { title });
          inputEl.value = "";
        } catch (error) {
          console.error("Failed to add todo:", error);
        } finally {
          isAdding = false;
          addButtonEl.disabled = false;
          addButtonEl.textContent = addButtonText;
        }
      });

      listEl.addEventListener("change", async (event) => {
        const checkbox = event.target;
        if (!checkbox.matches('input[type="checkbox"]')) return;
        const id = checkbox.closest("li")?.dataset.id;
        if (!id) return;

        if (!checkbox.checked) {
          checkbox.checked = true;
          return;
        }

        if (busyTodoIds.has(id)) return;
        busyTodoIds.add(id);
        checkbox.disabled = true;
        const rowEl = checkbox.closest("li");
        if (rowEl) rowEl.dataset.busy = "true";

        try {
          await callTodoTool("complete_todo", { id });
        } catch (error) {
          console.error("Failed to complete todo:", error);
        } finally {
          busyTodoIds.delete(id);
          render();
        }
      });

      render();
    </script>
  </body>
</html>
在你的 Web 组件中使用 Apps SDK
对于新应用,请使用 MCP Apps 宿主桥接:基于以下方式的 JSON-RPC postMessage
with ui/* 通知和方法,例如 tools/call.
ChatGPT 继续支持 Apps SDK 兼容性及可选的 ChatGPT 扩展。有关详细信息,请参阅 ChatGPT 中的 MCP Apps 兼容性.
构建 MCP 服务器
安装官方的 Python 或 Node MCP SDK 来创建服务器并暴露一个 /mcp endpoint.
在本快速入门中,我们将使用 Node SDK.
如果你使用的是 Python,请参阅我们的 GitHub 上的示例代码库 以查看使用 Python SDK 的 MCP 服务器示例。
使用以下命令安装 Node SDK、MCP Apps 辅助工具和 Zod:
npm install @modelcontextprotocol/sdk @modelcontextprotocol/ext-apps zod带有 Apps SDK 资源的 MCP 服务器
为你的组件包和模型可以调用的工具(例如 add_todo and complete_todo),以便 ChatGPT 能够驱动 UI。
创建一个名为 server.js 的文件,并粘贴以下使用 Node SDK 的示例:
import { createServer } from "node:http";
import { readFileSync } from "node:fs";
import {
  registerAppResource,
  registerAppTool,
  RESOURCE_MIME_TYPE,
} from "@modelcontextprotocol/ext-apps/server";
import { McpServer } from "@modelcontextprotocol/sdk/server/mcp.js";
import { StreamableHTTPServerTransport } from "@modelcontextprotocol/sdk/server/streamableHttp.js";
import { z } from "zod";

const todoHtml = readFileSync("public/todo-widget.html", "utf8");

const addTodoInputSchema = {
  title: z.string().min(1),
};

const completeTodoInputSchema = {
  id: z.string().min(1),
};

const todoOutputSchema = {
  tasks: z.array(
    z.object({
      id: z.string(),
      title: z.string(),
      completed: z.boolean(),
    })
  ),
};

let todos = [];
let nextId = 1;

const replyWithTodos = (message) => ({
  content: message ? [{ type: "text", text: message }] : [],
  structuredContent: { tasks: todos },
});

function createTodoServer() {
  const server = new McpServer({ name: "todo-app", version: "0.1.0" });

  registerAppResource(
    server,
    "todo-widget",
    "ui://widget/todo.html",
    {},
    async () => ({
      contents: [
        {
          uri: "ui://widget/todo.html",
          mimeType: RESOURCE_MIME_TYPE,
          text: todoHtml,
        },
      ],
    })
  );

  registerAppTool(
    server,
    "add_todo",
    {
      title: "Add todo",
      description: "Creates a todo item with the given title.",
      inputSchema: addTodoInputSchema,
      outputSchema: todoOutputSchema,
      _meta: {
        ui: { resourceUri: "ui://widget/todo.html" },
      },
    },
    async (args) => {
      const title = args?.title?.trim?.() ?? "";
      if (!title) return replyWithTodos("Missing title.");
      const todo = { id: `todo-${nextId++}`, title, completed: false };
      todos = [...todos, todo];
      return replyWithTodos(`Added "${todo.title}".`);
    }
  );

  registerAppTool(
    server,
    "complete_todo",
    {
      title: "Complete todo",
      description: "Marks a todo as done by id.",
      inputSchema: completeTodoInputSchema,
      outputSchema: todoOutputSchema,
      _meta: {
        ui: { resourceUri: "ui://widget/todo.html" },
      },
    },
    async (args) => {
      const id = args?.id;
      if (!id) return replyWithTodos("Missing todo id.");
      const todo = todos.find((task) => task.id === id);
      if (!todo) {
        return replyWithTodos(`Todo ${id} was not found.`);
      }

      todos = todos.map((task) =>
        task.id === id ? { ...task, completed: true } : task
      );

      return replyWithTodos(`Completed "${todo.title}".`);
    }
  );

  return server;
}

const port = Number(process.env.PORT ?? 8787);
const MCP_PATH = "/mcp";

const httpServer = createServer(async (req, res) => {
  if (!req.url) {
    res.writeHead(400).end("Missing URL");
    return;
  }

  const url = new URL(req.url, `http://${req.headers.host ?? "localhost"}`);

  if (req.method === "OPTIONS" && url.pathname === MCP_PATH) {
    res.writeHead(204, {
      "Access-Control-Allow-Origin": "*",
      "Access-Control-Allow-Methods": "POST, GET, OPTIONS",
      "Access-Control-Allow-Headers": "content-type, mcp-session-id",
      "Access-Control-Expose-Headers": "Mcp-Session-Id",
    });
    res.end();
    return;
  }

  if (req.method === "GET" && url.pathname === "/") {
    res.writeHead(200, { "content-type": "text/plain" }).end("Todo MCP server");
    return;
  }

  const MCP_METHODS = new Set(["POST", "GET", "DELETE"]);
  if (url.pathname === MCP_PATH && req.method && MCP_METHODS.has(req.method)) {
    res.setHeader("Access-Control-Allow-Origin", "*");
    res.setHeader("Access-Control-Expose-Headers", "Mcp-Session-Id");

    const server = createTodoServer();
    const transport = new StreamableHTTPServerTransport({
      sessionIdGenerator: undefined, // stateless mode
      enableJsonResponse: true,
    });

    res.on("close", () => {
      transport.close();
      server.close();
    });

    try {
      await server.connect(transport);
      await transport.handleRequest(req, res);
    } catch (error) {
      console.error("Error handling MCP request:", error);
      if (!res.headersSent) {
        res.writeHead(500).end("Internal server error");
      }
    }
    return;
  }

  res.writeHead(404).end("Not Found");
});

httpServer.listen(port, () => {
  console.log(
    `Todo MCP server listening on http://localhost:${port}${MCP_PATH}`
  );
});
该代码片段还会响应 GET / 进行健康检查,处理 OAuth 发现路由(你尚未使用)的 CORS 预检请求。这可以防止 ChatGPT 的连接器向导在未配置身份验证的情况下迭代时出现 502 错误。 /mcp and nested routes like /mcp/actions,并返回 404 Not Found 本地运行
如果你使用的是 React 之类的 Web 框架,请将组件构建为静态资产,以便 HTML 模板可以内联它们。通常,你可以运行以下构建命令:
目录中包含你编译后的资产。 npm run build to produce a dist 在本快速入门中,由于我们使用的是原生 HTML,因此无需构建。
在以下端口启动 MCP 服务器:
,从包含 http://localhost:<port>/mcp 的目录中运行 server.js (or server.ts).
确保你已经安装了 "type": "module" in your package.json file:
{
  "type": "module",
  "dependencies": {
    "@modelcontextprotocol/sdk": "^1.20.2",
    "@modelcontextprotocol/ext-apps": "^1.0.1",
    "zod": "^3.25.76"
  }
}
然后使用以下命令启动服务器:
node server.jsThe server should print Todo MCP server listening on http://localhost:8787/mcp 一旦准备就绪。
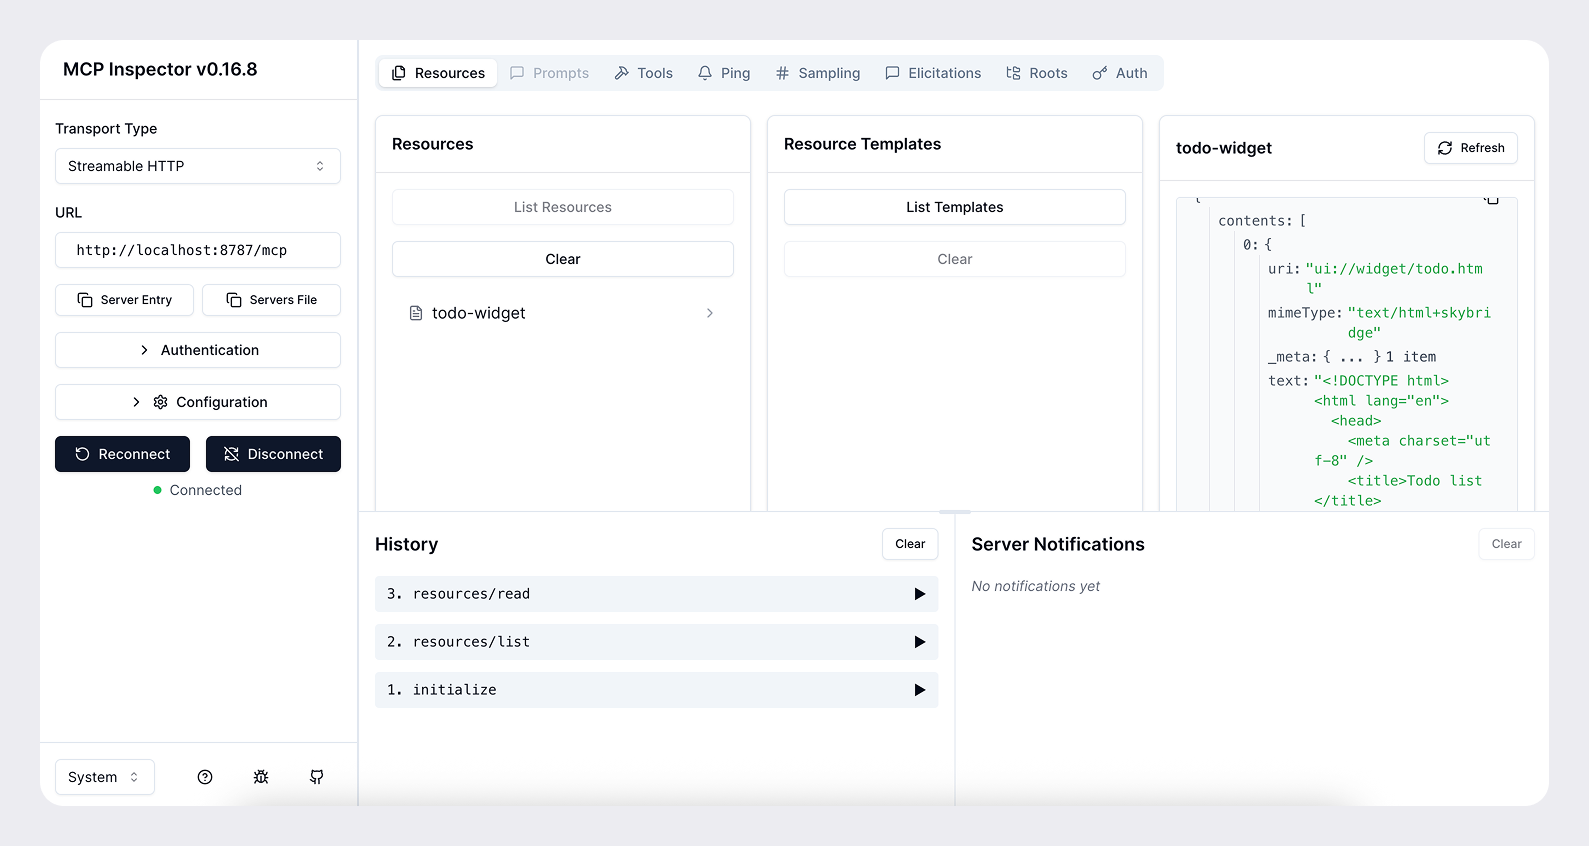
使用 MCP Inspector 测试
图像生成端点 MCP Inspector 在本地测试你的服务器。
npx @modelcontextprotocol/inspector@latest --server-url http://localhost:8787/mcp --transport http这将会打开一个浏览器窗口并显示 MCP Inspector 界面。你可以使用它来测试你的服务器并查看工具响应。
将你的服务器暴露到公共互联网
为了让 ChatGPT 在开发期间能够访问你的服务器,你需要将其暴露到公共互联网。你可以使用诸如 ngrok 的工具来为你的本地服务器开启隧道。
ngrok http <port>这将为你提供一个类似 https://<subdomain>.ngrok.app 的公共 URL,你可以使用它从 ChatGPT 访问你的服务器。
当你添加连接器时,请提供带有 /mcp 路径的公共 URL(例如 https://<subdomain>.ngrok.app/mcp).
将你的应用添加到 ChatGPT
一旦你的 MCP 服务器和 Web 组件在本地成功运行,你就可以通过以下步骤将你的应用添加到 ChatGPT:
- 启用 开发者模式 下 设置 → 应用与连接器 → 高级设置 in ChatGPT.
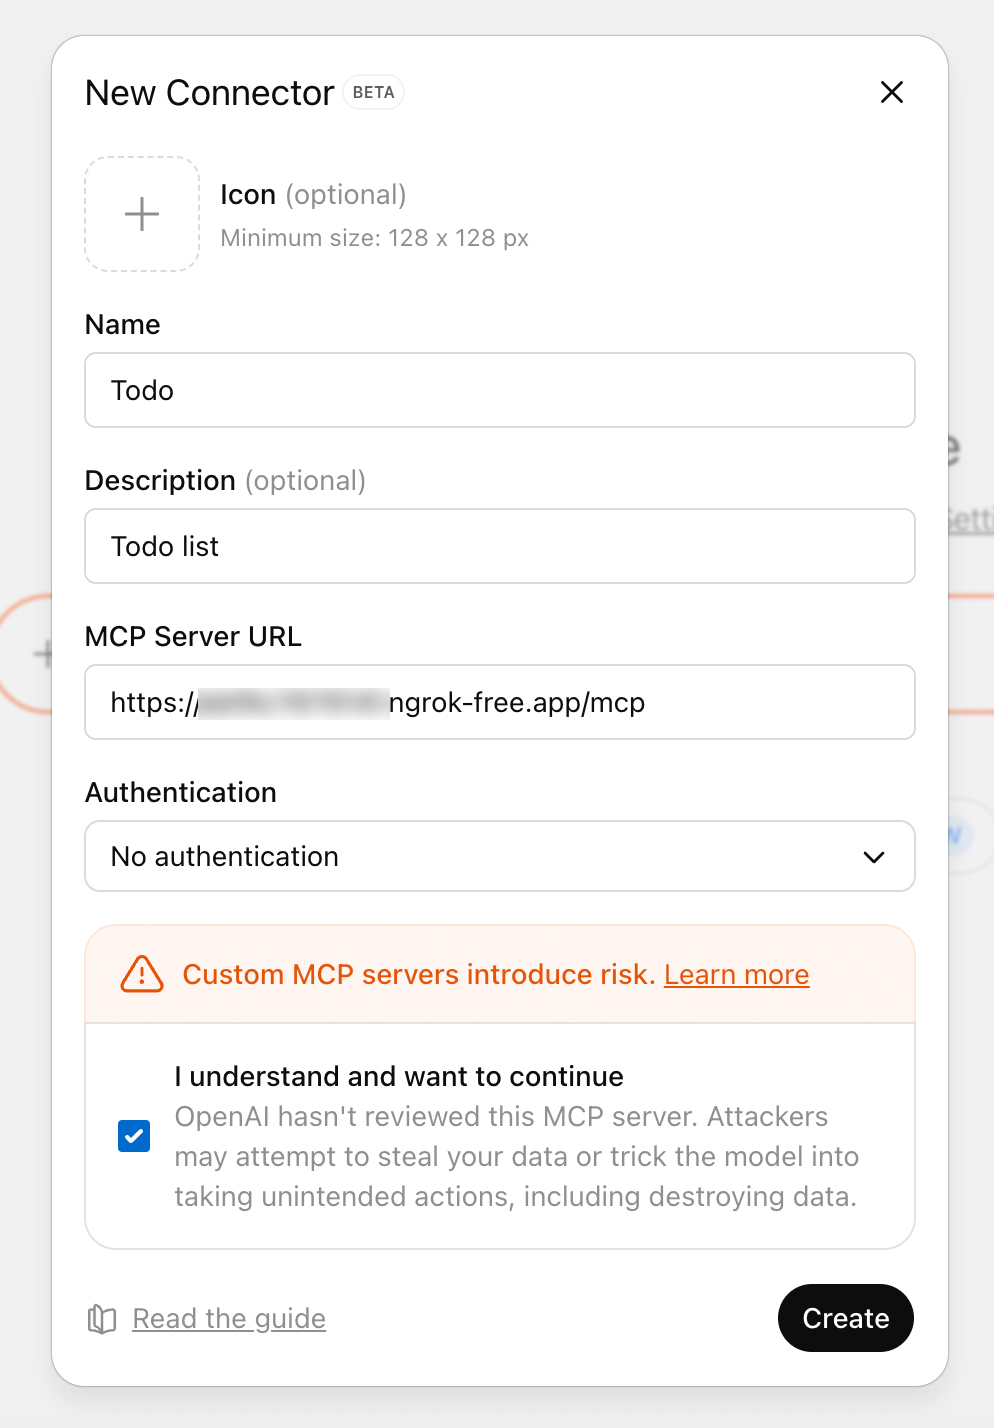
- 点击右上角的 创建 按钮以在 设置 → 连接器 并粘贴来自你的隧道或部署的 HTTPS +
/mcpURL(例如https://<subdomain>.ngrok.app/mcp). - 为连接器命名,提供简短描述,然后点击 创建.
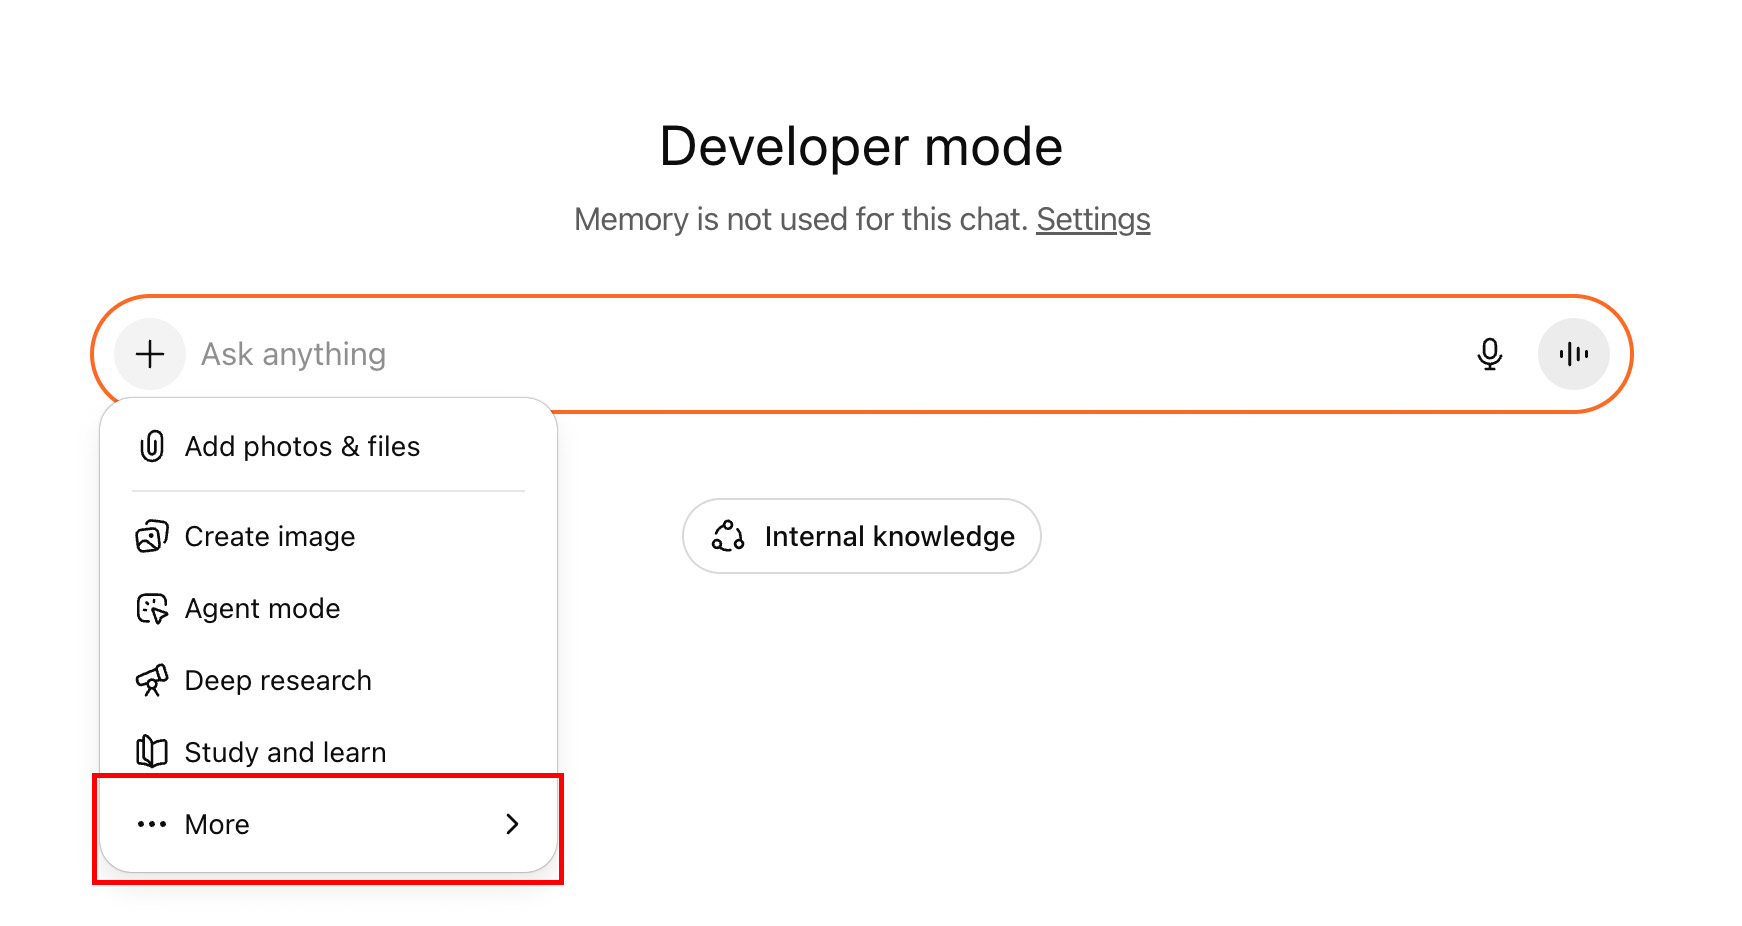
- 打开一个新对话,从 更多 菜单(点击 + 按钮后可访问)中添加你的连接器,并提示模型(例如,“添加一个新任务来读我的书”)。ChatGPT 将以流式传输工具负载,以便你可以确认输入和输出。
后续步骤
接下来,你可以迭代 UI/UX、提示词、工具元数据以及整体体验。
在每次更改 MCP 服务器(工具、元数据等)后刷新连接器。你可以通过点击 刷新 按钮来完成此操作,位于 设置 → 连接器 选中你的连接器之后。
在准备提交时,请查阅 ChatGPT 应用提交指南 and 研究你的用例。如果您正在构建 UI,您还可以查看 设计指南.
了解基础知识后,你可以利用 Apps SDK 来 构建 ChatGPT UI 使用 Apps SDK 基本组件, 对用户进行身份验证 如有需要,并 持久化状态.