
Weather.gov 示例
NSW(美国国家气象局)维护了一个 公共 API ,用户可以查询该 API 来获取任意经纬度点的天气预报。要获取天气预报,需执行 2 个步骤:
- 用户将经纬度提供给 api.weather.gov/points API,并接收返回的 WFO(气象预报办公室)、grid-X 和 grid-Y 坐标
- 将这 3 个要素传入 api.weather.gov/forecast API,以获取该坐标的天气预报
在本示例中,我们将构建一个自定义 GPT,用户只需输入城市、地标或经纬度坐标,该自定义 GPT 即可回答有关该位置天气预报的问题。
第 1 步:编写并测试 Open API schema(使用 Actions GPT)
GPT Action 需要一个 Open API 架构 来描述 API 调用的参数,这是描述 API 的标准规范。
OpenAI 发布了一个公共的 Actions GPT 来帮助开发者编写此 schema。例如,你可以前往 Actions GPT 并提问: “Go to https://www.weather.gov/documentation/services-web-api 并阅读该页面上的文档。为 /points/{latitude},{longitude} 和 /gridpoints/{office}/{gridX},{gridY}/forecast API 调用构建一个 Open API Schema”
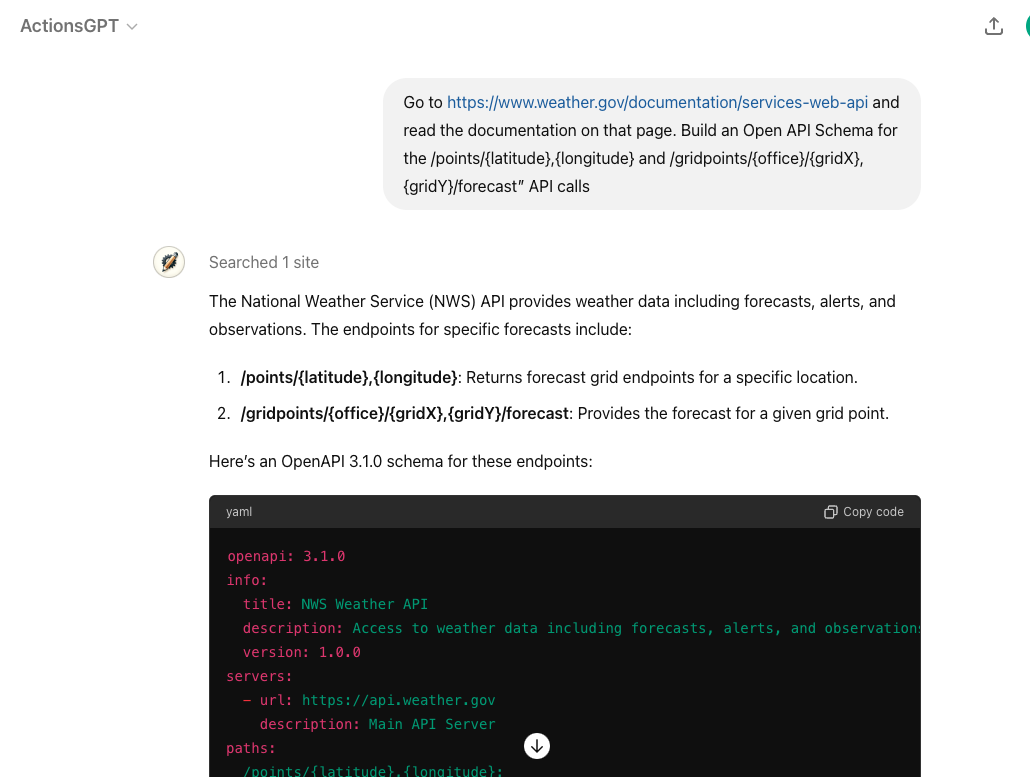
Below is the full Open API Schema that the Actions GPT Returned:
1
2
3
4
5
6
7
8
9
10
11
12
13
14
15
16
17
18
19
20
21
22
23
24
25
26
27
28
29
30
31
32
33
34
35
36
37
38
39
40
41
42
43
44
45
46
47
48
49
50
51
52
53
54
55
56
57
58
59
60
61
62
63
64
65
66
67
68
69
70
71
72
73
74
75
76
77
78
79
80
81
82
83
84
85
86
87
88
89
90
91
92
93
94
95
96
97
98
99
100
101
102
103
104
105
106
107
108
109
110
111
112
113
openapi: 3.1.0
info:
  title: NWS Weather API
  description: Access to weather data including forecasts, alerts, and observations.
  version: 1.0.0
servers:
  - url: https://api.weather.gov
    description: Main API Server
paths:
  /points/{latitude},{longitude}:
    get:
      operationId: getPointData
      summary: Get forecast grid endpoints for a specific location
      parameters:
        - name: latitude
          in: path
          required: true
          schema:
            type: number
            format: float
          description: Latitude of the point
        - name: longitude
          in: path
          required: true
          schema:
            type: number
            format: float
          description: Longitude of the point
      responses:
        "200":
          description: Successfully retrieved grid endpoints
          content:
            application/json:
              schema:
                type: object
                properties:
                  properties:
                    type: object
                    properties:
                      forecast:
                        type: string
                        format: uri
                      forecastHourly:
                        type: string
                        format: uri
                      forecastGridData:
                        type: string
                        format: uri

  /gridpoints/{office}/{gridX},{gridY}/forecast:
    get:
      operationId: getGridpointForecast
      summary: Get forecast for a given grid point
      parameters:
        - name: office
          in: path
          required: true
          schema:
            type: string
          description: Weather Forecast Office ID
        - name: gridX
          in: path
          required: true
          schema:
            type: integer
          description: X coordinate of the grid
        - name: gridY
          in: path
          required: true
          schema:
            type: integer
          description: Y coordinate of the grid
      responses:
        "200":
          description: Successfully retrieved gridpoint forecast
          content:
            application/json:
              schema:
                type: object
                properties:
                  properties:
                    type: object
                    properties:
                      periods:
                        type: array
                        items:
                          type: object
                          properties:
                            number:
                              type: integer
                            name:
                              type: string
                            startTime:
                              type: string
                              format: date-time
                            endTime:
                              type: string
                              format: date-time
                            temperature:
                              type: integer
                            temperatureUnit:
                              type: string
                            windSpeed:
                              type: string
                            windDirection:
                              type: string
                            icon:
                              type: string
                              format: uri
                            shortForecast:
                              type: string
                            detailedForecast:
                              type: string
ChatGPT 使用顶部的 info (特别是其中的描述)来判断此 action 是否与用户查询相关。
1
2
3
4
info:
  title: NWS Weather API
  description: Access to weather data including forecasts, alerts, and observations.
  version: 1.0.0
然后,下方的 parameters 进一步定义了 schema 的每个部分。例如,我们在告知 ChatGPT, office 参数指的是气象预报办公室 (WFO)。
1
2
3
4
5
6
7
8
9
10
11
/gridpoints/{office}/{gridX},{gridY}/forecast:
  get:
    operationId: getGridpointForecast
    summary: Get forecast for a given grid point
    parameters:
      - name: office
        in: path
        required: true
        schema:
          type: string
        description: Weather Forecast Office ID
Key: 请特别注意你在此 Open API schema 中使用的 schema 名称 and 描述 。ChatGPT 会使用这些名称和描述来理解 应调用哪个 API action 以及 应使用哪个参数。如果某个字段仅限于特定值,你还可以提供一个带有描述性类别名称的“enum”。
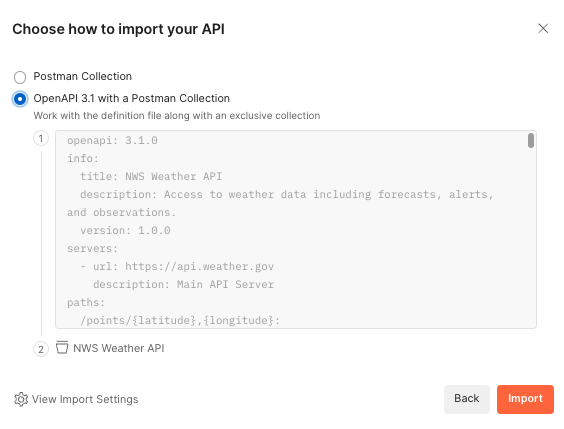
虽然你可以直接在 GPT Action 中尝试 Open API schema,但直接在 ChatGPT 中调试可能具有挑战性。我们建议使用第三方服务,例如 Postman, 来测试你的 API 调用是否正常工作。Postman 注册免费,错误处理提示详尽,且身份验证选项全面。它甚至支持直接导入 Open API 架构(见下文)。
第 2 步:确定身份验证要求
这个天气第三方服务不需要身份验证,因此你可以跳过该自定义 GPT 的这一步。对于其他确实需要身份验证的 GPT Action,有 2 个选项:API Key 或 OAuth。向 ChatGPT 提问可以帮助你针对最常见的应用快速上手。例如,如果我需要使用 OAuth 向 Google Cloud 进行身份验证,我可以提供一张截图并询问详细信息: “我正在通过 OAuth 建立与 Google Cloud 的连接。请提供有关如何填写每个这些框的说明。”

通常,ChatGPT 会针对所有 5 个要素提供正确的说明。完成这些基本准备后,请尝试在 Postman 或其他类似服务中测试和调试身份验证。如果遇到错误,请将错误信息提供给 ChatGPT,它通常可以帮助你从那里开始进行调试。
第 3 步:创建并测试 GPT Action
现在是创建你的自定义 GPT 的时候了。如果你以前从未创建过自定义 GPT,请从我们的 创建 GPT 指南.
- 开始。提供名称、描述和图像来描述你的自定义 GPT
- 转到 Action 部分,并粘贴你的 Open API schema。在编写说明时,请记下 Action 名称和 json 参数。
- 添加你的身份验证设置
- 返回主页并添加说明
There are many ways to write successful instructions: the most important thing is that the instructions enable the model to reflect the user’s preferences.
Typically, there are three sections:
- Context to explain to the model what the GPT Action(s) is doing
- Instructions on the sequence of steps – this is where you reference the Action name and any parameters the API call needs to pay attention to
- Additional Notes if there’s anything to keep in mind
Here’s an example of the instructions for the Weather GPT. Notice how the instructions refer to the API action name and json parameters from the Open API schema.
**Context**: A user needs information related to a weather forecast of a specific location.
**Instructions**:
1. The user will provide a lat-long point or a general location or landmark (e.g. New York City, the White House). If the user does not provide one, ask for the relevant location
2. If the user provides a general location or landmark, convert that into a lat-long coordinate. If required, browse the web to look up the lat-long point.
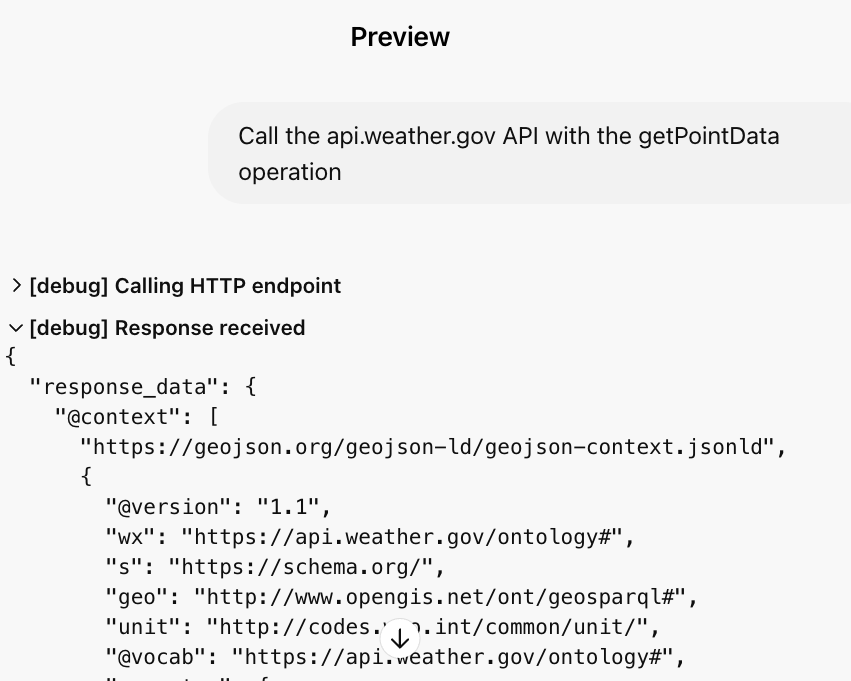
3. Run the "getPointData" API action and retrieve back the gridId, gridX, and gridY parameters.
4. Apply those variables as the office, gridX, and gridY variables in the "getGridpointForecast" API action to retrieve back a forecast
5. Use that forecast to answer the user's question
**Additional Notes**:
- Assume the user uses US weather units (e.g. Fahrenheit) unless otherwise specified
- If the user says "Let's get started" or "What do I do?", explain the purpose of this Custom GPT测试 GPT Action
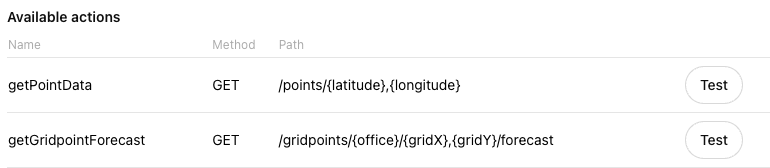
在每个操作旁边,你会看到一个“ 测试 ”按钮。点击该按钮测试各个操作。在测试中,你可以查看每次 API 调用的详细输入和输出。
如果你的 API 调用在 Postman 等第三方工具中正常工作,但在 ChatGPT 中却无法运行,可能存在以下几个原因:
- ChatGPT 中的参数错误或缺失
- ChatGPT 中存在身份验证问题
- 你的指令不完整或不明确
- Open API 架构中的描述不清晰
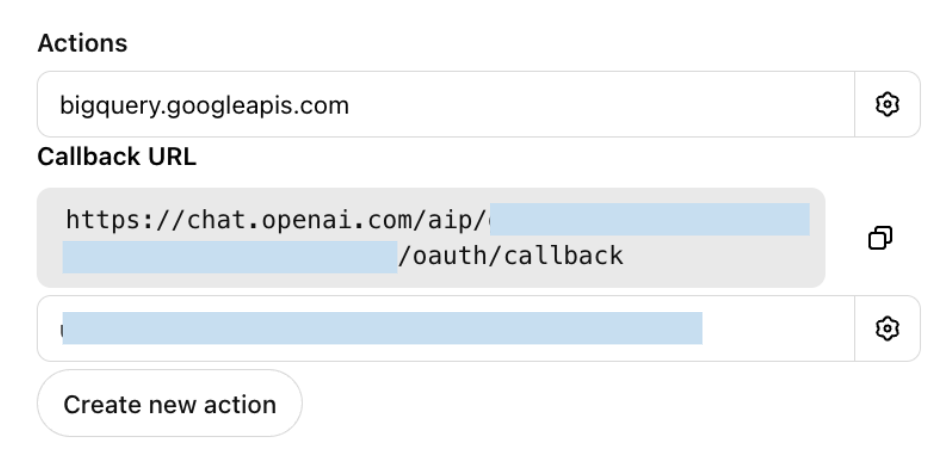
步骤 4:在第三方应用中设置回调 URL
如果你的 GPT Action 使用 OAuth 身份验证,你需要在你的第三方应用中设置回调 URL。在为 GPT Action 设置 OAuth 后,ChatGPT 会为你提供一个回调 URL(每当你更新其中一个 OAuth 参数时,此 URL 都会更新)。复制该回调 URL,并将其添加到你应用中的相应位置。
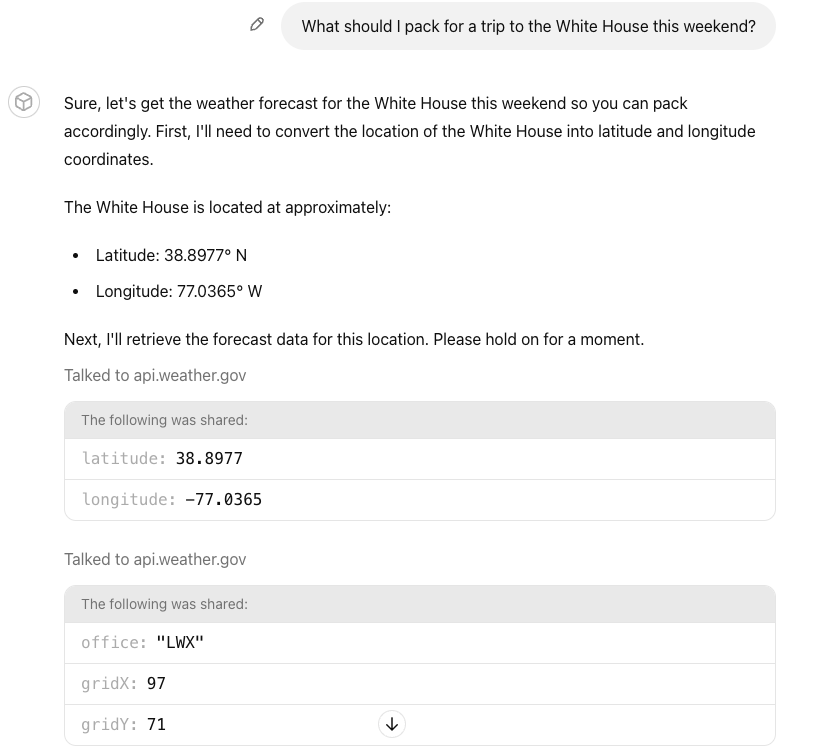
步骤 5:评估 Custom GPT
即使你在上一步中已经测试了 GPT Action,你仍需要评估指令和 GPT Action 是否符合用户的预期。尝试为 “评估集” 中的问题构思出至少 5-10 个具有代表性的问题(越多越好)来向你的 Custom GPT 提问。
Key: 测试 Custom GPT 是否按你的预期处理了你的每一个问题。
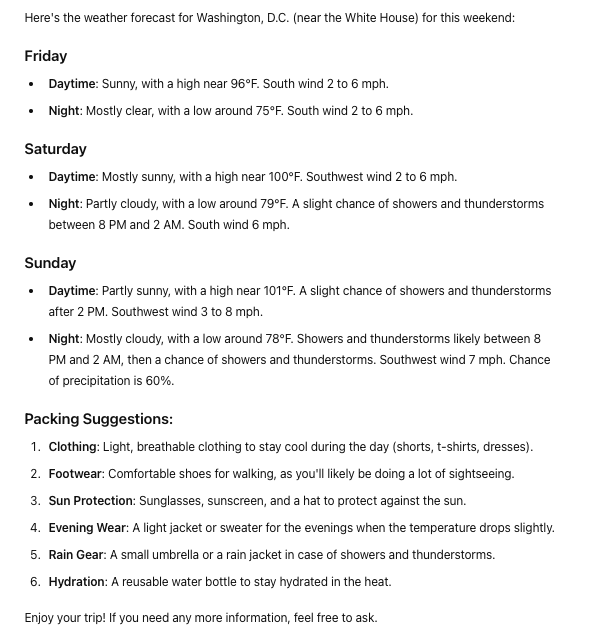
An example question: “这个周末去白宫旅行我该准备些什么?” 测试了自定义 GPT 的以下能力:(1) 将地标转换为经纬度,(2) 运行两个 GPT Actions,以及 (3) 回答用户的问题。
常见调试步骤
Challenge: GPT Action 调用了错误的 API(或根本没有调用)
- Solution: 确保 Actions 的描述清晰——并在你的自定义 GPT Instructions 中提及 Action 的名称
Challenge: GPT Action 调用了正确的 API,但参数使用不正确
- Solution: 在 GPT Action 中添加或修改参数的描述
Challenge: 自定义 GPT 无法正常工作,但我没有收到明确的错误信息
- Solution: 务必测试该 Action——测试窗口中提供了更详尽的日志。如果仍然不清楚,请使用 Postman 或其他第三方服务来进行更好的诊断。
Challenge: 自定义 GPT 出现身份验证错误
- Solution: 确保你的回调 URL 设置正确。尝试在 Postman 或其他第三方服务中测试完全相同的身份验证设置
Challenge: 自定义 GPT 无法处理更复杂/有歧义的问题
- Solution: 尝试在自定义 GPT 中对你的 instructions 进行提示词工程。请参阅我们 提示词工程指南
本自定义 GPT 构建指南到此结束。祝你顺利构建并利用 OpenAI 开发者论坛 如果你有其他问题。